How to Install and Use Bitnami's Sealed Secrets
Published on: July 28, 2024 by Jose Angel Morena & Alex Carnesecchi
What Are Bitnami Sealed Secrets?
Problem: "I can manage all my K8s config in git, except Secrets."
Solution: Encrypt your Secret into a SealedSecret, which is safe to store - even inside a public repository. The SealedSecret can be decrypted only by the controller running in the target cluster and nobody else (not even the original author) is able to obtain the original Secret from the SealedSecret.
This method doesn't replace Kubernetes secrets; it still utilizes base64-encoded secrets within your Kubernetes cluster. However, it does offer the significant advantage of allowing you to securely store your secrets in Git repositories along with any other Kubernetes resources.
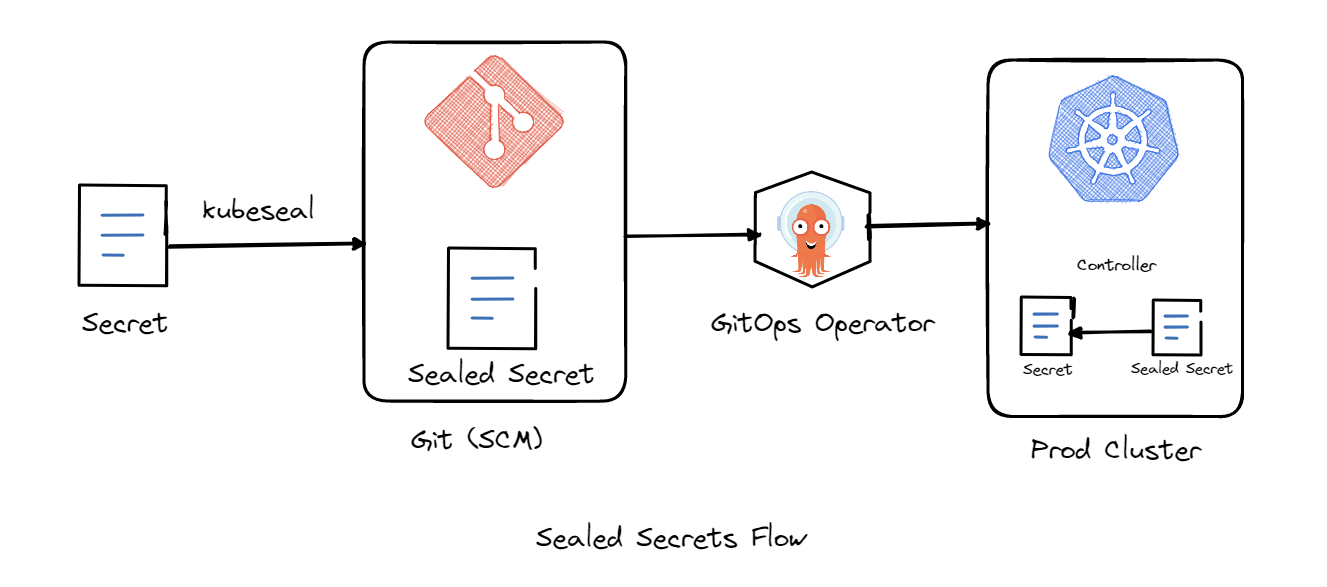
How It Works
Sealed Secrets works by converting regular Kubernetes secrets into "sealed secrets," which are encrypted versions of the secrets. These sealed secrets can be safely stored in version control systems, shared across teams, and used in continuous integration and deployment (CI/CD) workflows without exposing the secret data.
Here's a brief overview of the process:
Encryption: The kubeseal utility encrypts a Kubernetes Secret using the public key of a Sealed Secrets controller deployed in the cluster. The encryption is one-way, meaning that the secret can only be decrypted by the controller.
Storage: Once encrypted, the sealed secret can be committed to a source control system, like Git, without risking exposure of the secret content.
Decryption: The Sealed Secrets controller running in the Kubernetes cluster watches for Sealed Secrets to be deployed. When it finds one, it decrypts it using its stored private key and then creates a regular Kubernetes Secret.
Usage: The decrypted Secret is then available in the cluster just like any other secret and can be used by your applications and services.
Prerequisites
Before you begin, ensure you have a functioning Kubernetes cluster. If you need assistance setting up a cluster on Digital Ocean at a cost-effective rate, you can refer to this detailed blog post.
For a quick reference to basic kubectl commands and some useful tips, check out this blog post.
Installation Guide
Setting Up the Sealed Secrets Controller for all namespaces in the cluster
Open your terminal and execute the following commands to download and install the Sealed Secrets controller:
VERSION="0.27.1"

URL="https://github.com/bitnami-labs/sealed-secrets/releases/download/v${VERSION}/controller.yaml"

wget -O controller.yaml "${URL}"
As of the time of this writing we are working with version 0.27.1 of the controller, if you would like to use a most recent version, check out the available releases. Feel free to override ${VERSION} with your desired release version.
This command will download the necessary YAML configuration for setting up the Sealed Secrets controller in your Kubernetes environment. The configuration includes the following components:
Deployment (sealed-secrets-controller): Deploys the controller pod in the kube-system namespace to manage the decryption of sealed secrets using a secured Docker image from Bitnami. Ultimately, the controller pod functions as a Kubernetes-native application that enhances the capabilities of your cluster. It enables the handling of SealedSecrets, a specialized resource type, facilitating secure management and integration of sensitive data within your Kubernetes environment.
ClusterRole (secrets-unsealer): Grants permissions to manage SealedSecrets and secrets, including the ability to create, list, update, and delete, as well as manage events and namespaces.
CustomResourceDefinition (sealedsecrets.bitnami.com): Introduces the SealedSecret resource, which allows for the secure handling of encrypted secrets.
Service (sealed-secrets-controller-metrics): Establishes a service within the kube-system namespace to expose metrics from the sealed-secrets-controller via port 8081.
Roles and RoleBindings in kube-system: These configurations enable the sealed-secrets-controller to operate on secrets within the kube-system namespace.
ClusterRoleBinding (sealed-secrets-controller): Links the secrets-unsealer role with the sealed-secrets-controller service account across all namespaces.
Service for sealed-secrets-controller: Facilitates internal communication within the kube-system namespace over port 8080.
Deploy the Bitnami Sealed Secrets controller using the following command:
kubectl apply -f controller.yaml
Verify the setup with:
kubectl get -f controller.yaml

kubectl api-resources --api-group=bitnami.com

kubectl explain sealedsecret

kubectl explain sealedsecret.spec

kubectl explain sealedsecret --recursive
The Bitnami Sealed Secrets controller is installed by default in the kube-system namespace and operates in strict mode. For more details on different modes, refer to the scopes section. In brief:
Strict: The secret must keep the same name and namespace as when originally sealed. Any changes will result in a decryption error.
Namespace-wide: The secret's name can be changed, but it must remain within the same namespace.
Cluster-wide: The secret can be renamed and utilized in any namespace throughout the cluster.
It is also possible to install the Bitnami Sealed Secrets controller using Helm.
Please, take into consideration that, by default, the Bitnami Sealed Secrets is installed at cluster-wide level, when running in strict mode, this is not a problem because the sealed secrets created in a given namespace cannot be decrypted in a different namespace. If you try to apply a sealedsecret in a different namespace from where it was created, an error will appear in the sealedsecret and the kubernetes secret will not be created. You can try to replicate this by creating a sealedsecret in default namespace and then applying that same secret in the kube-system namespace, you should be able to see that the controller failed at creating the new kubernetes secret.
If you want to troubleshoot a specific sealedsecret you can run this command:
kubectl describe sealedsecret malicioussecret
You should be able to see an error similar to this:
Events:

  Type     Reason           Age                From            Message

  ----     ------           ----               ----            -------

  Warning  ErrUnsealFailed  42s (x6 over 42s)  sealed-secrets  Failed to unseal: no key could decrypt secret (password, username)
This is an expected error, since I am running the Bitnami Sealed Secret controller in kube-system namespace and in "strict" mode, it is not expected to be able to decrypt a sealedsecret from any other namespace.
Setting Up the Sealed Secrets Controller for a specific namespace
If you do not intend to deploy the Bitnami Sealed Secrets in cluster-wide, you can deploy it for a single namespace. In order to do so, you need to make sure to set args for the deployment of the controller to:
- args:

    - --all-namespaces=false
You can look up for args in the aforementioned file controller.yml.
The option --all-namespaces scans all namespaces or only the current namespace. By default, its value is true. If you set it to false, then the controller will only work for the namespace where it was deployed.
There is also the option --additional-namespaces. Which is a comma-separated list of additional namespaces to be scanned, if you wish the controller to only look for SealedSecrets in specific namespaces.
When using the helm chart you can override this setting during installation:
helm install sealed-secrets bitnami/sealed-secrets --set args[0]=--all-namespaces=false
Take into consideration that this command will override the default arguments.
Installing Kubeseal
Kubeseal is a CLI tool that creates a sealedsecret from a kubernetes native secret. It communicates with the controller and retrieves the public key needed for encrypting the secrets.
For macOS:
brew install kubeseal
For Linux:
Determine the appropriate download based on your system's architecture:
BASE_URL="https://github.com/bitnami-labs/sealed-secrets/releases/download"

VERSION="0.27.1"

PLATFORM="linux-amd64"


URL="${BASE_URL}/v${VERSION}/kubeseal-${VERSION}-${PLATFORM}.tar.gz"

wget ${URL}

tar -xvzf kubeseal-${VERSION}-linux-amd64.tar.gz -C /usr/local/bin kubeseal
To check your system's architecture:
uname -m                             # Outputs processor architecture

cat /proc/cpuinfo | grep model name  # Provides detailed CPU information
Creating a Sealed Kubernetes Secret
Step 1: Creating a file with a Kubernetes secret
Create a file named mysecret.yaml and add the following content, replacing your-username and your-password with your actual secret data.
You can run the following command in order to create the secret:
kubectl create secret generic mysecret --from-literal=username='your-username' --from-literal=password='your-password' --dry-run=client -o yaml > mysecret.yaml
If you are eager to know more about "--dry-run=client" option, check out this link.
Step 2: Creating the Sealed Secret file
With the secret defined, you can now seal it using kubeseal. Run the following command to fetch the public key from your cluster and seal the secret:
kubeseal <mysecret.yaml --controller-namespace kube-system --format yaml > sealedsecret.yaml
This command processes the secret defined in mysecret.yaml, encrypts it, and saves the resulting sealed secret in a file called sealedsecret.yaml. The encryption ensures that the sealed secret is secure for storage in version control systems such as GitHub or GitLab repositories or for sharing with your team. For instance, you can find an example of such a sealed secret in my public repository. Since it is encrypted, it remains secure even when publicly accessible. This enables the seamless integration of sealed secrets with other essential resources, such as deployments and configmaps, necessary for deploying your applications.
Step 3: Apply the sealed secret
To deploy the sealed secret to your Kubernetes cluster, use the following kubectl command:
kubectl apply -f sealedsecret.yaml
The Sealed Secrets controller in your cluster will notify that a sealed secret was created and then it will decrypt the sealed secret and create a regular Kubernetes secret from it.
Step 4: Verify
To ensure that the sealed secret was applied correctly and the original secret was created, you can check the secret in your cluster:
kubectl get secrets mysecret -o yaml
This command will show the decrypted secret, but keep in mind that you should restrict access to this command to maintain the confidentiality of your data.
Considerations
- In order to manage your secret you need to do it using the sealedsecret. That means, if someday you wish to replace any value, you would need to repeat steps above to reencrypt the credentials.
- If you remove a sealedsecret, its corresponding Kubernetes native secret will also be removed by the controller.
Uninstalling Bitnami Kubernetes Sealed Controller
In order to uninstall the controller, run following command:
kubectl delete -f controller.yml
Please, take into consideration that by removing the controller, all sealed secrets will disappear and therefore your secrets will disappear as well.
Conclusion
In conclusion, this method allows you to push your secrets along with other resources in your Git repository safely. Adopting this practice helps maintain rigorous security standards while leveraging the collaborative and version-controlled environment of Git, facilitating a more streamlined and secure workflow in your DevOps practices.
Please remember to clean up your Kubernetes lab environment in Digital Ocean if you set it up following our article. This will help you maintain cost-effectiveness and manage resources efficiently.